User Guide
Patientist is command-line interface (CLI) based desktop app that is designed to streamline patient and staff management for small clinics and hospitals. Its intuitive interface is easy to navigate, and its command-based system is straightforward and efficient. With just a few keystrokes, you can access patient records, add todos and manage your staff, making it easy for you to get tasks done faster and more reliably than traditional GUI based apps.

Using this guide
- If you are setting up for the first time, please have a look at our Quick Start section.
- If you are unsure how to use Patientist, the Features section might be a good place to start.
- For ease of navigation, clicking the hyperlinks at the bottom of each section to go back to the table of contents.
- If there are any terms that are unfamiliar to you, do check out our Glossary for a brief description of those terms.
Components of Patientist
Throughout the User Guide, we may refer to certain components of the application, so we have labelled them in the image below for you to reference easily.

| Component | Location(with respect to the above image) | What it does |
|---|---|---|
| Command Prompt | Purple | This is where you type the commands to be executed |
| Message Box | Green | This is where Patienist gives you messages, usually pertaining to whether a certain command has been executed successfully or not |
| List Panel | Orange | This is where you can view information in a list; will be a list of people or wards |
| View panel | Blue | This is where you can view all the detailed information in relation to a specific person |
| Help button | Top of screen | Allows you to access the help command without having to type the command |
| Exit button | Top of screen | Similarly allows you to exit the program without having to type the command |
| Saved File Location | Bottom of screen | Displays the current location that the Patientist data is being saved to |
Overview of symbols
We will be using certain symbols throughout the User Guide, so here is a quick summary of what the symbols mean:
Table of Contents
- Quick start
- Features
- FAQ
- Command Summary
- Glossary
- Planned Enhancements
Quick start
- Ensure you have Java 11 installed on your computer. If you are unsure you can download it from here.
- Download the latest release of Patientist from here.
- Copy the file to the folder you’d like to use as the home folder for your Patientist app.
- Double-click the Patientist.jar file to open the app. There will be some sample data to play around with.
- Type in commands and press ENTER to execute the command.
helpwould be a good first command to use to get a sensing of how to use this app. - Refer to the Features or Command Summary sections to see summary of commands.
Features
![]() Notes about formatting
Notes about formatting
- Words in UPPER_CASE are user supplied arguments, e.g.
addpat n/NAME:NAMEis an argument, and the command can be used as addn/John Doe - Items in square brackets are optional arguments, e.g.
addpat n/NAME [t/TAG]can be used asaddpat n/John Doe t/urgentor simply asaddpat n/John Doe - Items with … after them can be specified 0 or more times, e.g.
[t/TAG]...means it is valid to not include a tag, or you can include 1 or moret/TAGexpressions - Extra arguments for commands that take in exactly 0 arguments will be ignored, e.g.
help 0will bring up the help window as with justhelp
Adding/Removing Wards
Patientist allows you to reflect the physical state of your hospital.
Let’s say the hospital has just added a new ward, with the name “Block B Ward 3”, and you would like to add it to Patientist.
Command entered: addward n/Block B Ward 3
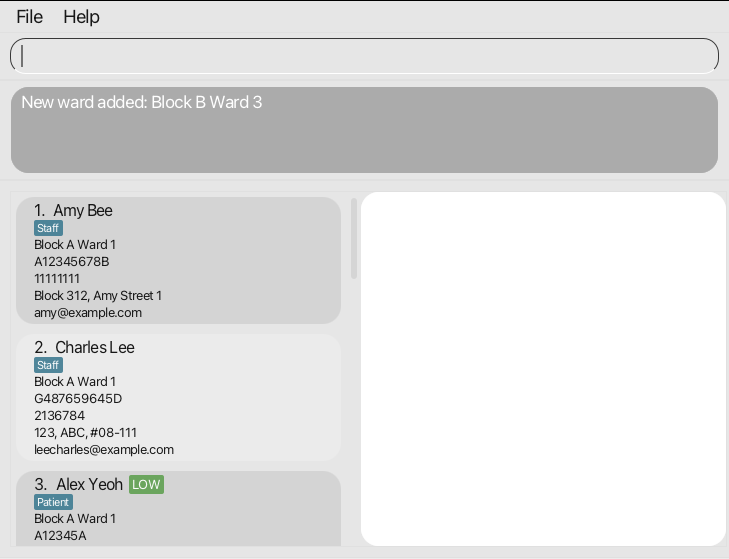
This means that the ward “Block B Ward 3” has been added to Patientist.
Now let’s say you accidentally added the wrong ward, and it should have been “Block 3 Ward A” instead.
Well, its just as simple to remove the ward. Simply use the delward command with the name of the ward to be removed.
A similar looking message should appear indicating that the ward was successfully removed. Thereafter, the correct ward can be added to Patientist.
[Go back to Table of Contents]
Adding a ward to the system: addward
Creates an empty ward with the specified WARD_NAME.
WARD_NAME is case-sensitive. block B ward 2 will refer to a different ward from Block b Ward 2
Format: addward n/WARD_NAME
WARD_NAME must be unique and cannot be the same as any existing name. This field is case-sensitive.
Examples:
addward n/block B ward 2 will create a new empty ward called block B ward 2
addward n/block C ward 1 will create a new empty ward called block C ward 1
[Go back to Table of Contents]
Deleting a ward from the system: delward
This deletes the WARD_NAME specified from the system. The ward being deleted must be empty for this command to be successfully executed.
WARD_NAME is case-sensitive. block B ward 2 will refer to a different ward from Block b Ward 2
Format: delward n/WARD_NAME
Examples:
delward n/block B ward 2 will remove block B ward 2 from the system. The ward must have been empty before deletion.
[Go back to Table of Contents]
Adding People
Now that Patientist has all the wards entered into the system, we can start to add the people to the system.
Consider that a new patient, John Doe, has just been admitted into ward “Block B Ward 2”.
Command entered: addpat n/John Doe id/A12345B w/Block B Ward 2 p/98765432 e/johnd@example.com a/311, Clementi Ave 2, #02-25 pr/LOW
This will the message that you should see:
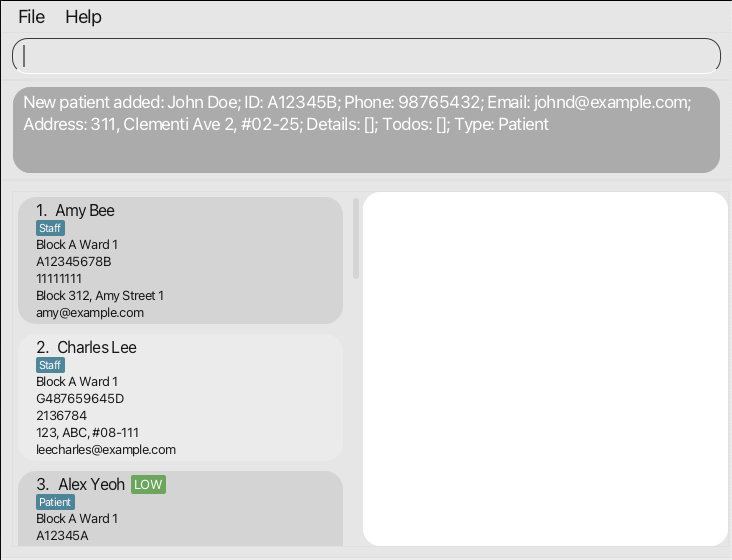
A similar command can also be used to add staff members, to make it easier to keep track of the staff as well.
All that you need to do is enter the command addstf with the staff’s details to add them to the system.
The message shown will similarly reflect the staff member added along with their entered details.
addward first.
[Go back to Table of Contents]
Adding a patient: addpat
Adds a new patient to the system, and places them in the WARD_NAME assigned.
Tags attached to a user are meant to be short notes that do not fit into any other category of patient details that can be added.
PRIORITY can take values of either LOW, MEDIUM or HIGH. Please only enter one of these 3 values (case-sensitive).
ID_NUMBER should be unique to each patient. This is not case-sensitive. A123456789B is identical to a123456789b.
This input will be capitalised automatically.
PATIENT_NAME need not be unique.
WARD_NAME is case-sensitive. block B ward 2 will refer to a different ward from Block b Ward 2.
Format: addpat n/PATIENT_NAME id/ID_NUMBER p/PHONE_NO e/EMAIL a/ADDRESS w/WARD_NAME pr/PRIORITY [t/TAG]...
Examples:
addpat n/John Doe id/A12345B w/Block B Ward 2 p/98765432 e/johnd@example.com a/Clementi Ave 2, #02-25 pr/LOW
[Go back to Table of Contents]
Adding a staff member: addstf
Assigns specified STAFF_NAME to the specified WARD_NAME.
The STAFF_NAME will be displayed in the list of personnel in charge of the ward.
ID_NUMBER should be unique to each staff member. This is not case-sensitive. A123456789B is identical to a123456789b.
This input will be capitalised automatically.
STAFF_NAME need not be unique.
WARD_NAME is case-sensitive. block B ward 2 will refer to a different ward from Block b Ward 2
Format: addstf n/STAFF_NAME id/ID_NUMBER p/PHONE_NO e/EMAIL a/ADDRESS w/WARD_NAME
Examples:
addstf n/Dr Mallory Wong id/A987654321H p/97365482 e/mwong@example.com a/390 Geylang Rd w/block B ward 2
addstf n/Nurse Joy id/A345678Z p/81623753 e/nurse.joy@example.com a/900 Still Rd w/block B ward 2
[Go back to Table of Contents]
Deleting people
Now let’s imagine that a patient is being discharged from the hospital, and you would like to remove this patient from the system. As it turns out, this can be done rather easily. If the patient to be deleted can be viewed in the GUI, we can use this command.
Command entered: delete 11
A message looking like this should be shown, indicating that the patient has been removed from the system.

However, it is easy to imagine if this could be quite difficult to do when there are many people in the system. Well not to worry!
You can simply remove patients using delpat, and remove staff members using delstf, by just specifying their unique ID numbers.
Both of these commands would result in a similar success message as the delete command shown above.
[Go back to Table of Contents]
Deleting a person from the system based on list on GUI: delete
This deletes the person specified by INDEX.
delete does not work with ward, will show an error message if called when wards are shown.
Format: delete INDEX
Examples: delete 3
[Go back to Table of Contents]
Deleting a patient from the system: delpat
This removes the patient from the system as specified by ID_NUMBER.
This will remove the patient from his or her assigned ward as well.
Format: delpat id/ID_NUMBER
Examples:
delpat id/A0123456789B will delete all records of patient with ID number A0123456789B from the system.
[Go back to Table of Contents]
Deleting a staff member from the system: delstf
This removes the staff from the system as specified by ID_NUMBER.
This will remove the staff from his or her assigned ward as well.
Format: delstf id/ID_NUMBER
Examples:
delstf id/A12345B will delete all records of staff with ID number A12345B from the system.
[Go back to Table of Contents]
Listing information
Sometimes, you may want to have a look at all the staff, or all the wards currently stored in the system. This is also easily done using the list commands.
If you would like to view all the people, patients or staff, you can use list, lspat, or lsstf respectively.
All three commands would show a message that looks like this, and update the GUI accordingly.
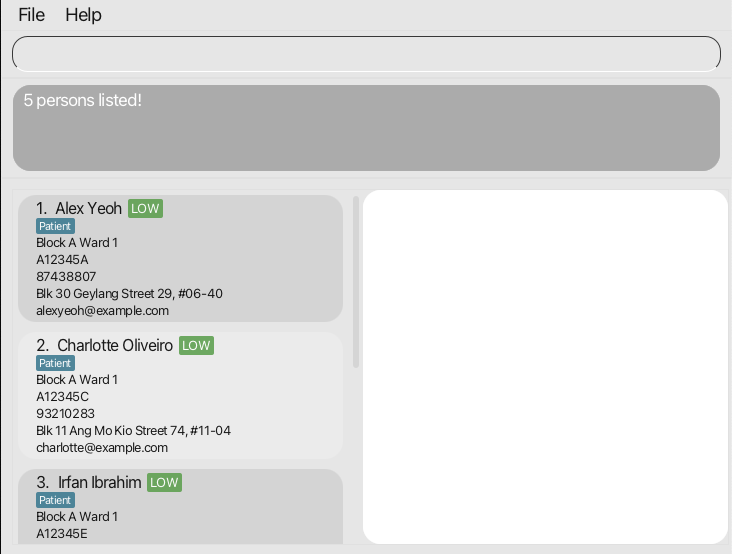
If you would like to have an overview of the wards, that is also possible using lsward, which will display the GUI as shown below.
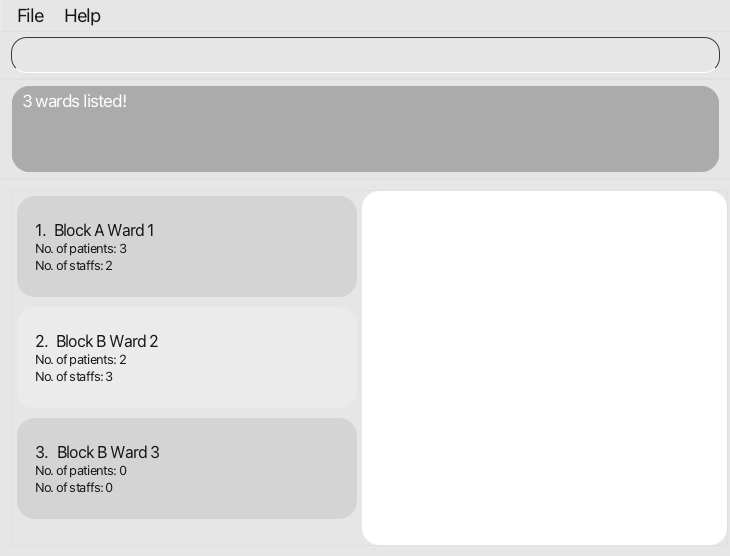
If perhaps you would like to see all the people in a particular ward, then the ward specific list commands,
lswardpat and lswardstf can be used for patients and staff respectively.
delete, e.g. index-based
commands for people will not work if the wards are being shown from lsward
[Go back to Table of Contents]
Listing all persons: list
Lists all the peoples’ names and corresponding ID, displaying any tags attached to them and showing the ward they are in.
Format: list
[Go back to Table of Contents]
Listing all patients: lspat
Lists all the patients’ names and corresponding patient ID, displaying any tags attached to them and showing the ward they are in.
Format: lspat
Examples:
lspat will list all patients in each ward on the GUI. Every ward will be displayed in order, with all patients in each ward.
[Go back to Table of Contents]
Listing staff members: lsstf
Lists staff members’ names and the name of the ward they are assigned to.
Format: lsstf
Examples:
lsstf will list all staff assigned to each ward on the GUI. The lists will be grouped according to ward, and each staff
can appear more than once if they are assigned to more than 1 ward.
[Go back to Table of Contents]
Listing the names of all wards: lsward
Lists all existing wards on the GUI. Only ward names will be displayed.
Format: lsward
[Go back to Table of Contents]
Listing all patients in a particular ward: lswardpat
Lists all the patients found in the given WARD_NAME.
Format: lswardpat WARD_NAME
Examples: lswardpat Block A Ward 1 will list all patients in Block A Ward 1.
[Go back to Table of Contents]
Listing all staff in a particular ward: lswardstf
Lists all the staff found in the given WARD_NAME.
Format: lswardstf WARD_NAME
Examples: lswardstf Block A Ward 1 will list all staff in Block A Ward 1.
[Go back to Table of Contents]
Finding people
Okay, but what if you are looking for one person in particular? To make things easier for you, we have added the find functionality,
which allows you to find people based on name or ID number. The find command will bring up a list of people whose name matches the keywords given.
Command entered: find Alex Irfan

If this find is too general, or if you only remember the ID numbers, we also offer the commands findpat and findstf, which allow you
to find either patients or staff using their name or their ID numbers.
[Go back to Table of Contents]
Finding a person: find
Finds all persons with names containing any of the specified keywords and displays them on the GUI.
find will list any person whose name matches the given keywords.\
You can enter any number of arguments for this command.
NAME is case-insensitive. Using an argument Alice will match names aLice, alice, ALICE etc.
Format: find NAME
Examples: find Alice Tan will display all persons with Alice or Tan in their name.
[Go back to Table of Contents]
Finding a patient by ID number: findpat
Finds all patients with names containing any of the specified keywords or id matching the specified keyword and displays them on the GUI.
Format: findpat [n/NAME] [id/ID_NUMBER]
Examples:
findpat n/Alex Bob Charles Finds all patients with names containing Alex, Bob or Charles.
findpat id/A12345B Finds all patients with IDs matching A12345B.
[Go back to Table of Contents]
Finding a staff by ID number: findstf
Finds all staff with names containing any of the specified keywords or id matching the specified keyword and displays them on the GUI.
Format: findstf [n/NAME] [id/ID_NUMBER]
Examples:
findstf n/Alex Bob Charles Finds all staff with names containing Alex, Bob or Charles.
findstf id/A12345B Finds all staff with IDs matching A12345B.
[Go back to Table of Contents]
Editing a person’s information
Now imagine that a person’s information has been keyed incorrectly, or if a person has been transferred to another ward, it would be pretty cumbersome to have to retype all that information. Luckily, we can use the editing commands to easily remedy this.
Let’s imagine that Alex Yeo’s name had been mistakenly spelt as Alex Yeoh. To change it to the correct spelling, we can make use
of the edit command, with the index of the person, and the information to change.
Command entered: edit 3 n/Alex Yeo

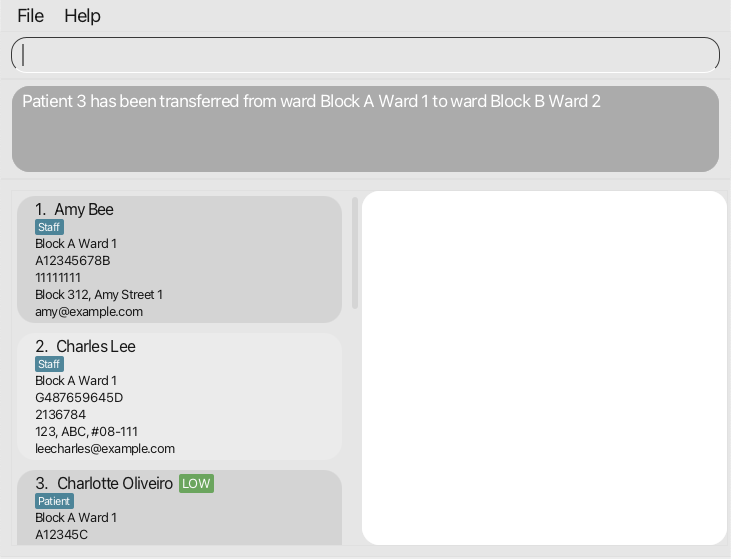
Now let’s say that the same patient Alex Yeo is being transferred to another ward, Block B Ward 2. To make this change,
we can use the trfward command.
Command entered: trfward 3 w/Block B Ward 2
[Go back to Table of Contents]
Update particulars of a person: edit
This overwrites the specified person’s particulars with new particulars. This command works on both patients and staff.
Format: edit INDEX [n/PATIENT_NAME] [t/TAG] [p/PHONE_NUMBER] [a/ADDRESS] [e/EMAIL]
Examples:
edit 1 p/81234567
edit 2 n/Bob Tan p/91234567
[Go back to Table of Contents]
Transferring a person between wards: trfward
This moves the person at INDEX position on the list to the specified WARD_NAME. WARD_NAME must already exist.
WARD_NAME is case-sensitive. block B ward 2 will refer to a different ward from Block b Ward 2
Format: trfward INDEX w/WARD_NAME
Examples:
trfward 2 w/Block C Ward 1 will transfer the second person on the main list to Block C Ward 1, if the ward exists.
[Go back to Table of Contents]
Adding/removing todos to a patient
As hospital staff, I imagine that you will have to keep track of certain tasks to be done with regards to certain patients, so
we have also added support for personal todo lists for each patient. You can use the addpattodo command,
along with the index and the task to be done to add to a patient’s todo list.
Command entered: addpattodo 3 td/Dialysis at 2pm
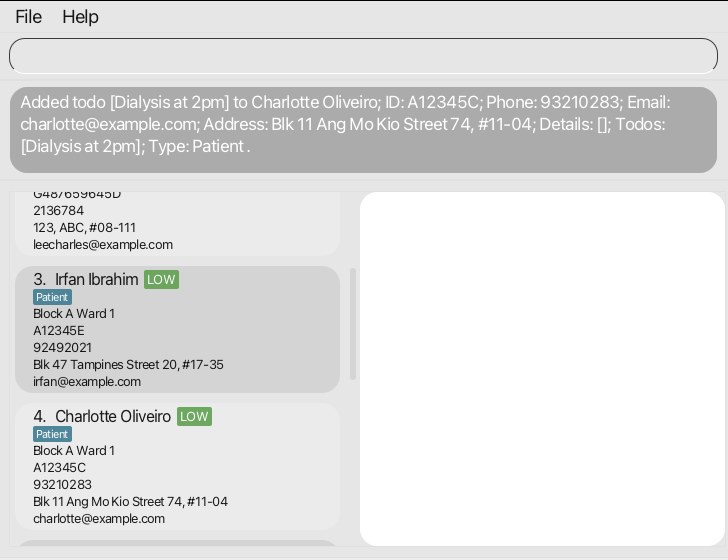
Similarly, once the todo has been completed, you can remove the todo using delpattodo with the index of the patient
and the todo as shown in the todo list.
[Go back to Table of Contents]
Adding patient todo: addpattodo
Adds an entry to the list of patient todos. This list of todos can be viewed by the view command.
Patient.\
You can enter any number of todo arguments for this command.
Format: addpattodo INDEX td/TODO [td/TODO]...
Examples: addpattodo 1 td/Take medicine td/physio at 2
[Go back to Table of Contents]
Deleting patient todo: delpattodo
Deletes the specified entry in the list of patient todos. This list of todos can be viewed by the view command.
Patient.
Format: delpattodo PATIENT_INDEX TODO_INDEX
Examples: delpattodo 1 1 will delete the first todo of the patient at the top of the patient list.
[Go back to Table of Contents]
Adding/removing a patient’s status
Patients are also bound to have some status details which may be important for staff to view. You can add a status detail
to a patient using the addpatstatus command, with the status detail you would like to add.
Command entered: addpatstatus 3 s/Fall risk
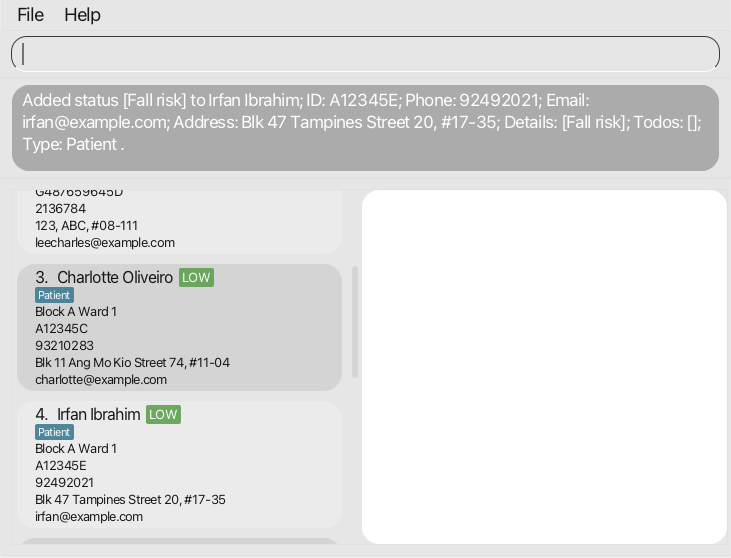
Conversely, if a patient’s status is no longer relevant, then we can just as easily remove the status detail using
delpatstatus, along with the index of the patient and the index of the status to be removed.
[Go back to Table of Contents]
Adding patient status: addpatstatus
Adds an entry to the list of patient statuses. This list of statuses can be viewed by the view command.
Patient.\
You can enter any number of status arguments for this command.
Format: addpatstatus INDEX s/STATUS [s/STATUS]...
Examples: addpatstatus 1 s/Feeling alright s/Eating well
[Go back to Table of Contents]
Deleting patient status: delpatstatus
Deletes the specified entry in the list of patient statuses. This list of statuses can be viewed by the view command.
Patient.
Format: delpatstatus PATIENT_INDEX STATUS_INDEX
Examples: delpatstatus 1 1 will delete the first status of the patient at the top of the patient list.
[Go back to Table of Contents]
Viewing all details of a person
So far, we have only been using the list to view information pertaining to certain people, but what if you want to view
all the details of a person? Well fret not, because we can use the view command to see all the data related to a person
in the system, say for instance, a patient by the name of Roy.
Command entered: view 10

As seen from the image above, the details of the person are shown in the secondary viewing panel on the right side, thereby making it more convenient to look up the full details of a person.
[Go back to Table of Contents]
Viewing the details of a specific person: view
Lists the full detail of a specific person, including their name, patient ID and tags in the main window.
Format: view INDEX
Examples:
view 1 will display all the information associated with the 1st person shown on the GUI.
[Go back to Table of Contents]
Clearing the patientist: clear
Clears the current session of patientist and restores it to empty state.
Format: clear
[Go back to Table of Contents]
Exiting the program: exit
Exits the program.
Format: exit
[Go back to Table of Contents]
Viewing help: help
Shows a popup explaining how to access the user guide, which is the help page.
Format: help
[Go back to Table of Contents]
FAQ
Q: How do I transfer my data to another Computer?
A: Install the app in the other computer and overwrite the empty data file it creates with the file that contains the data of your previous Patientist home folder.
Q: How do I ensure that I have Java 11 on my computer?
A: Check how to find the Java version in your computer here.
[Go back to Table of Contents]
Command Summary
| Action | Format | Examples |
|---|---|---|
| View help | help |
|
| Clear patientist | clear |
|
| Add patient | addpat n/PATIENT_NAME id/ID_NUMBER p/PHONE_NO e/EMAIL a/ADDRESS w/WARD_NAME pr/PRIORITY [t/TAG]... |
addpat n/John Doe id/A12345B w/Block B Ward 2 p/98765432 e/johnd@example.com a/Clementi Ave 2, #02-25 pr/LOW |
| Add staff | addstf n/STAFF_NAME id/ID_NUMBER p/PHONE_NO e/EMAIL a/ADDRESS w/WARD_NAME |
addstf n/Dr Mallory Wong id/A987654321H p/97365482 e/mwong@example.com a/390 Geylang Rd w/block B ward 2 |
| Add ward | addward n/WARD_NAME |
addward n/block B ward 2 |
| List patients | lspat |
|
| List staff members | lsstf |
|
| Find person | find NAME |
find Alice Tan |
| Find patient by ID | findpat [n/NAME] [id/ID_NUMBER] |
findpat n/Alex Bob Charles, findpat id/A12345B
|
| Find staff by ID | findstf [n/NAME] [id/ID_NUMBER] |
findstf n/Alex Bob Charles, findstf id/A12345B
|
| Add patient status | addpatstatus INDEX s/STATUS [s/STATUS]... |
addpatstatus 1 s/Feeling alright s/Eating well |
| Delete patient status | delpatstatus PATIENT_INDEX STATUS_INDEX |
delpatstatus PATIENT_INDEX STATUS_INDEX |
| Add patient todo | addpattodo INDEX td/TODO [td/TODO]... |
addpattodo 1 td/Take medicine td/physio at 2 |
| Delete patient todo | delpattodo PATIENT_INDEX TODO_INDEX |
delpattodo 1 1 |
| View details of a person | view INDEX |
view 1 |
| List wards | lsward |
|
| List patients in a ward | lswardpat WARD_NAME |
lswardpat Block A Ward 1 |
| List staff in a ward | lswardstf WARD_NAME |
lswardstf Block A Ward 1 |
| Update person’s particulars | edit INDEX [n/PATIENT_NAME] [t/TAG] [p/PHONE_NUMBER] [a/ADDRESS] [e/EMAIL] |
edit 2 n/Bob Tan p/91234567 |
| Delete person from system based on GUI | delete INDEX |
delete 2 |
| Delete patient from system | delpat id/ID_NUMBER |
delpat id/A0123456789B |
| Delete staff member from system | delstf id/ID_NUMBER |
delstf id/A12345B |
| Delete ward from system | delward n/WARD_NAME |
delward n/block B ward 2 |
| Transferring patient between wards | trfward INDEX w/WARD_NAME |
trfward 2 w/Block C Ward 1 |
| Exit the program | exit |
[Go back to Table of Contents]
Glossary
| Term | Definition |
|---|---|
| Person | Relating to either a patient or staff member |
| Index | The number specifying the position of the person, status, or todo. Is shown explicitly next to the corresponding item. |
| Command | A specific instruction given to the Patientist appication to perform some task |
| Argument | A means of providing more information to a command, e.g. Using the command view 9, 9 is considered the argument has it provides the context to the command. |
| Home Folder | The directory that contains the Patientist.jar file, usually defaults to Downloads right after downloading the file. |
| Java | A widely-used programming language for coding applications, and the language used to make Patientist |
| CLI | Command Line Interface, a text-based user interface used to execute commands |
| GUI | Graphical User Interface, the point of contact between users and the Patientist application, displayed in a visual format |
[Go back to Table of Contents]
Planned Enhancements
- Currently, the
addwardcommand is case-sensitive, soaddward n/Block A Ward 1andaddward n/block A ward 1would result in two different wards being added, even though it is likely that they should refer to the same ward. We plan to make this command case-insensitive to ensure duplicate wards are not added by accident. - The commands that add or delete todos and statuses from patients,
addpattodo,delpattodo,addpatstatus,delpatstatus, currently change the order of patients in the list of patients. We plan to change this behaviour such that the index and position of patients is preserved when using these commands, so users would have an easier time tracking the patients. - The
viewcommand currently does not update in real time, so if a change is made using a command lkeaddpattodo, the change will not be visible until theviewcommand is used again. We plan to change it such that theviewcommand updates the information shown in the GUI after every change so that the correct information is always reflected in the view panel. - The
lswardcommand also does not update in real time likeview. Commands that change state of the ward likeaddpatmay not have their changes reflected untillswardis called again. We plan to change this in the future such that the information shown in ward list always reflects the internal state of Patientist. - Currently,
helponly links the URL to this User Guide. We plan to change it in the future to show a command summary as well to simplify the process of finding the syntax for a certain command.
[Go back to Table of Contents]